
 To continue the easy Easter decorating theme for this week I'll show you what I did with some plain and not so plain ol' chicken eggs.
 I have a very stylin' friend that just happens to also have a small farm. And on this farm she has some chickens... and these chickens lay beautifully colored eggs. She tells me this is because a chicken lays eggs the same color as its' ears... I'm not sure whether or not to believe this, as I don't recall seeing a chicken's ears before... And I've been around my share of chickens - but that's a story for another day...
 Anywho - If you want to display "real" eggs, you have to empty them out first - otherwise you risk Templeton the Rat coming for a visit.

Go ahead and assemble all the "tools" you'll need...
- Paint - I used Making Memories Meadow & Celery (green), Eggplant & Lilac (purple), and Sunflower & Banana (yellow).
- Foam Brushes
- A Paper Plate (or something to use to hold your paint)
- 12" Bamboo Skewers (1 for each egg)
- Floral Foam (1 block)
- Embroidery Needle or Straight Pin
- Fine Glitter - I used Martha Stewart that was on clearance after Christmas at Wal-Mart. Don't hate me... I don't buy much of her stuff.
- Glitter Glue with a fine tip applicator (it came with the glitter...)
- Craft Mess Tray (that pink thing - it might be called a bead tray...)
- Dryer Sheets (wipe your tray before you glitter - cleaning up the glitter will be much easier!)
- Q-Tips and Toothpicks (for painting the designs on your eggs)
- Raw Eggs (and something to store the contents in)
- 1/8 inch ribbon in your three main colors (not shown)
Stick to no more than 3 paint colors if you want a "decorator" look - I used a coordinating shade and tint each of purple, yellow and green. The sponge brushes work nicely, especially if you want to thin your paint - they're perfect for spreading your glue too even if you want to coat the entire egg with glitter.
First decide how you're going to use your eggs.

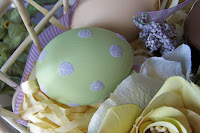
When I know I'm going to have the eggs displayed in a basket or something like a vase, jar, etc, I don't put the holes on the ends of the eggs, but rather put both holes on one side like you see here.

Then you can hide the holes with the placement of the eggs.
These same eggs are above - just turned over.
But since we're going to hang these painted eggs, the holes need to be as close to the center of each end as possible. It's not rocket surgery - just eyeball it.
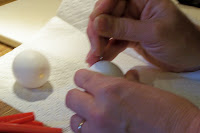 I like to poke my holes with a sturdy needle - like the thick embroidery kind. Start with one tiny hole and slowly expand out from there until it's big enough for the contents to pass through fairly easily. At the same time, don't make the hole so big that it's impossible to tie a little knot in the ribbon and not have it slip through.
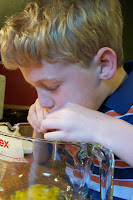
 Break the yolk with your needle or a thin wire and then start blowing.
They say one of those snot suckers (like you use to clean out a baby's congested nose) is good for blowing out the egg so you don't get dizzy... but I never get dizzy anymore. I just use a nine-year-old.
Save the insides for cooking or baking. If you store them two eggs at a time in a sealed container you can easily use them in recipes - but don't wait too long - once the shell is broken you need to use them within two days. There's more than you ever wanted to know about egg safety here.
Maybe you should just serve scrambled eggs for dinner and be done with it.
After they're all blown out, you need to rinse them the best you can. Just fill them a little with water, cover your holes with your finger and thumb, shake it up and blow the water out.
Gently feed the skewers through the eggs and put them in the foam block to dry completely and wait for you to get your paint ready.
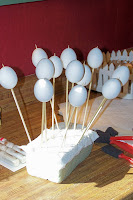
Paint a thin even coat on your eggs and let it dry thoroughly on the skewers.

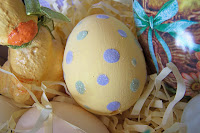
Do some decorative designs like stripes and polka-dots. I use the end of a Q-Tip dipped in paint for nearly perfect polka-dots.
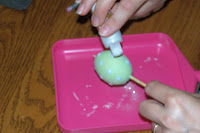
After your accent paint is dry, use the fine tipped applicator to apply a little glitter glue. It doesn't take much.

Quickly sprinkle the glitter over all the wet glue. Be generous - just be sure you have something to catch the excess glitter so you can return it to the container and use it again.
A plastic bead tray works great. If you give it a wipe with a dryer sheet before, the glitter won't cling to the plastic as bad and should slide out the little hole on the end and back in to your container.
Gently tap the egg with your fingernail to knock off the extra glitter and place the skewered egg back in the foam to dry.
When the glitter is completely dry, pick a coordinating ribbon and run it through the egg. You might need to poke a toothpick through the tip of the ribbon to help you.
Tie a big knot (I use a surgeons knot - it holds well). If your holes are big, it might take more than one knot on top of the other. A decorative bead bigger than the hole would work to keep the ribbon from pulling through too.
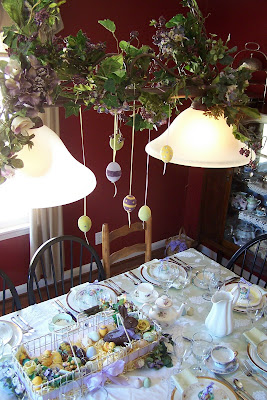
They look nice when they hang with the small end down. Of course, this will look ridiculous if you've written any words on your egg with the small end up...
Here are some of the eggs that didn't make the hanging cut.


And the finished project again.
I had to LOL at your post title. Great tutorial on decorating eggs! I think that's something I'll have to try someday :)
ReplyDeleteI will have to give it a shot at some point, it looks like fun!!!!
ReplyDeleteHugs, :) Heather S.
Someday, I will try this! Thanks for the tutorial!
ReplyDelete